 Save to Pinterest
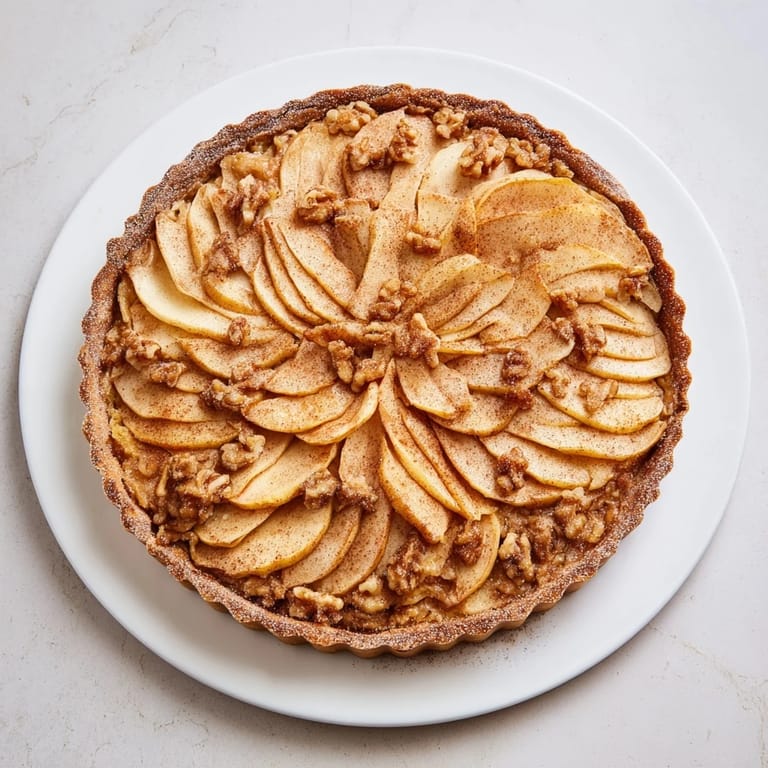
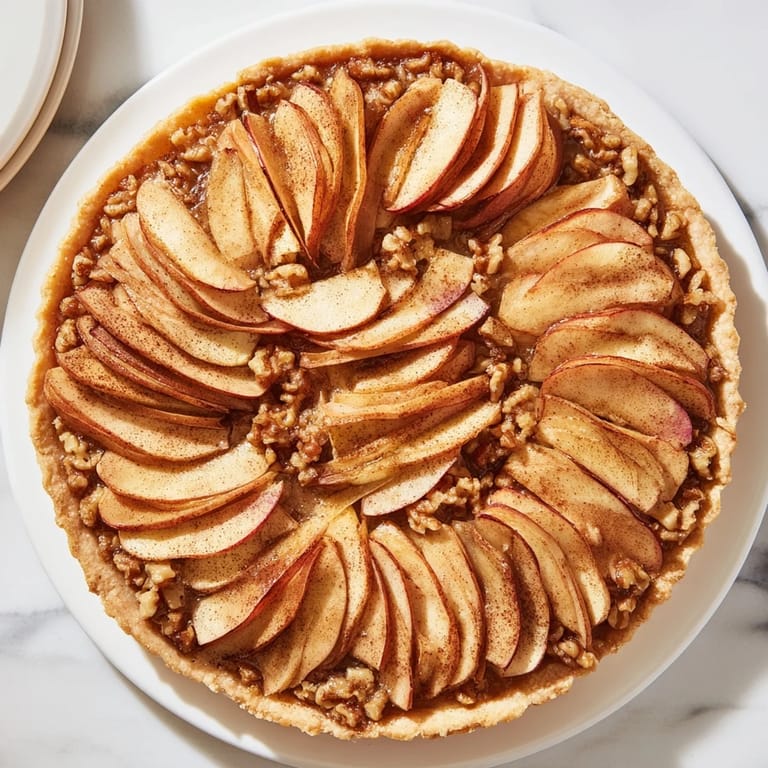
 The first time I attempted a lattice tart, I was convinced it would be impossible—a pastry project reserved for professional bakers with steady hands and years of practice. Then one October afternoon, with a bowl of apples and an unexpected burst of confidence, I discovered that imperfection could actually be beautiful. That day, my slightly wonky lattice became the centerpiece of dinner, and guests didn't notice the uneven weaving; they only tasted the honey-sweetened walnuts and tender apples. Now, The Lattice Orchard feels like the most natural thing to make when autumn arrives.
I made this for a small dinner party on a crisp November evening, and what surprised me most wasn't the compliments about the lattice—it was watching my friend close her eyes after the first bite, tasting that exact moment where the crispness of the crust meets the soft apples and that subtle honey whisper underneath. That's when I knew this wasn't just another apple dessert; it was something that somehow made people pause and actually taste what was in front of them.
Ingredients
- All-purpose flour (1 1/4 cups): The foundation of a tender crust—keeping it cold and working quickly keeps the butter distinct, creating those delicate flaky layers.
- Unsalted butter (1/2 cup, cold and cubed): Cold butter is non-negotiable; warm butter gives you a dense crust instead of the shatteringly good one you're after.
- Granulated sugar (2 tbsp for crust): A small amount adds subtle sweetness without overpowering the filling—the crust should be a supporting player.
- Ice water (3–4 tbsp): Add it slowly and sparingly; too much water toughens the dough, and you'll regret it immediately.
- Walnuts (1 cup, chopped): Toasted walnuts deepen in flavor, but even raw ones bring an earthy balance to the honey's sweetness.
- Honey (1/4 cup): This is your secret ingredient—it caramelizes slightly during baking and creates those moments of concentrated sweetness.
- Light brown sugar (2 tbsp): Adds moisture and depth; don't skip it for extra honey, as the texture won't be the same.
- Cinnamon (1/2 tsp for filling, 1/2 tsp for apples): Warm and grounding, cinnamon is what makes this taste like autumn decided to become a dessert.
- Apples (3 large, preferably Honeycrisp or Granny Smith): Firm varieties hold their shape during baking; avoid soft apples that collapse into mush.
- Lemon juice (1 tbsp): A small but essential detail that prevents browning and brightens the apple flavor without tasting sour.
Tired of Takeout? 🥡
Get 10 meals you can make faster than delivery arrives. Seriously.
One email. No spam. Unsubscribe anytime.
Instructions
- Build your crust foundation:
- Combine flour, sugar, and salt, then work the cold butter in until everything looks like coarse breadcrumbs—this is where patience pays off. Add ice water just until the dough comes together, press it gently into your pan, prick the bottom with a fork, and let it rest in the refrigerator for 15 minutes while you gather yourself.
- Blind bake for structure:
- Line the crust with parchment and weight it down with pie weights or dried beans to prevent puffing, baking for 12 minutes, then another 5 minutes without the weights. You want it barely golden—it'll continue cooking once the filling goes in.
- Compose the walnut layer:
- While the crust cools, mix walnuts, honey, brown sugar, cinnamon, and a pinch of salt, then spread this mixture evenly across the bottom. This is your flavor foundation, so don't rush it.
- Slice apples with intention:
- Peel them if you prefer (the skin adds texture, but some people find it jarring), then slice them paper-thin on a mandoline or with a very sharp knife—about 1/8 inch thick. Toss immediately with lemon juice, sugar, and cinnamon to keep them bright and prevent that brown-oxidized look.
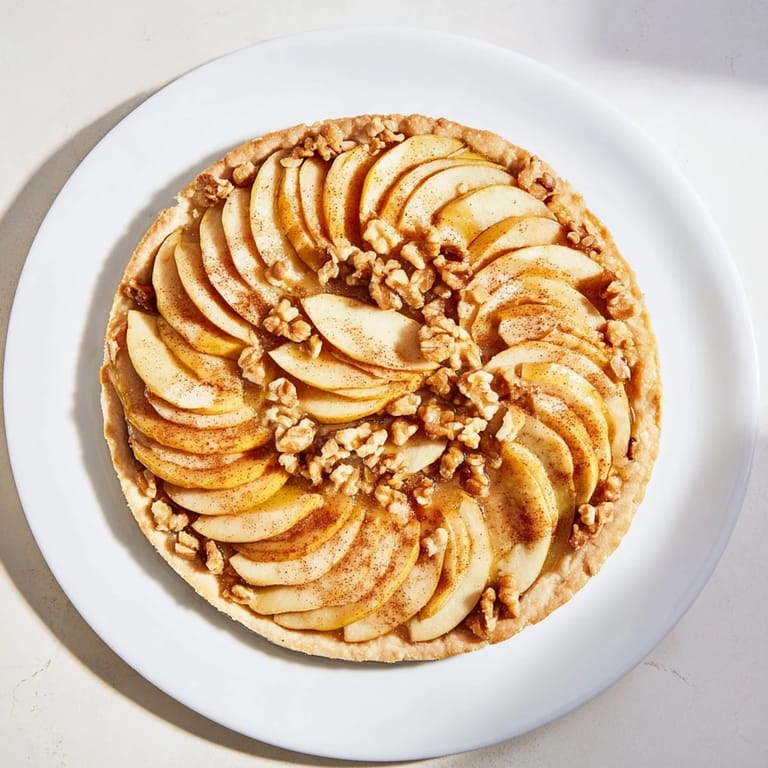
- Weave the lattice top:
- This sounds more complicated than it is; lay half your apple slices in parallel rows on parchment, slightly overlapping, then weave the remaining slices over and under to create a basket-like pattern. Carefully slide the whole thing onto your tart and trim any overhang—imperfections add character.
- Bake with gentle heat:
- Cover loosely with foil for the first 20 minutes to protect the lattice from browning too fast, then uncover and bake another 10–15 minutes until the apples are tender and the edges are lightly golden. You'll know it's ready when you can easily pierce an apple slice with a fork.
- Cool and serve with intention:
- Let it rest for at least 20 minutes before slicing—this sets everything and makes serving infinitely easier. Serve it warm for that honey-softened feeling or at room temperature when the flavors become more distinct and contemplative.
 Save to Pinterest
 There's something about watching someone cut through that lattice for the first time—the slight resistance of the crust, then the soft sigh of the apple as the knife moves through it—that makes you remember why you bake. It's not about impressing anyone; it's about creating these small moments where food becomes a conversation, a memory, a reason to sit a little longer at the table.
Why This Dessert Works Year-Round
While autumn is when apples sing their loudest, this tart adapts beautifully to any season. In spring, the honey-walnut combination feels lighter and brighter; in summer, serving it chilled transforms it into something almost refreshing. Winter brings a coziness to those warm spices that feels like comfort and elegance wrapped together. The lattice itself never goes out of style—it's a visual that tells people you care about both beauty and flavor, even when the calendar says something entirely different.
The Art of Apple Slicing
The thickness of your apple slices determines everything about the final texture. Thin slices—and I mean genuinely thin, almost transparent—weave together effortlessly and bake down into tender ribbons that catch the light. A mandoline slicer changes this entire task from tedious to almost meditative, though a very sharp knife and a steady hand work just as well. The lemon juice isn't just flavor; it's insurance against oxidation and browning, keeping your lattice looking fresh and intentional rather than careless.
Variations That Feel Natural
Once you've made this once, you'll start seeing variations everywhere—pecans instead of walnuts, a brush of warmed apricot jam after baking for an extra glossy finish, even a vanilla ice cream or whipped cream spoon waiting on the side. Some evenings I skip the cinnamon entirely and add a tiny amount of cardamom instead, which makes the whole thing feel slightly more mysterious. The beauty of this tart is that it's flexible enough to bend with your mood and pantry, yet strong enough in its core to never lose what makes it special.
- Toast your walnuts lightly before mixing to deepen their flavor and add a subtle crunch.
- A thin brush of egg wash on the crust before blind baking gives it a subtle sheen that catches light beautifully.
- Save any apple scraps for a simple compote or add to your morning oatmeal instead of letting them go to waste.
 Save to Pinterest
 This is the tart I turn to when I want to feel like I know what I'm doing in the kitchen, even on days when everything else feels uncertain. It never fails, and it always tells people something true about who you are when it lands on their plate.
Recipe FAQs
- → What apples work best for the lattice top?
Firm, sweet-tart apples like Honeycrisp or Granny Smith hold their shape well and balance sweetness and acidity.
- → How do I create the lattice pattern?
Lay half the thin apple slices in parallel rows and weave the remaining slices over and under to form an elegant lattice.
- → Can I substitute walnuts with other nuts?
Pecans offer a delicious alternative, adding a slightly different flavor and texture to the filling.
- → How do I prevent the crust from becoming soggy?
Blind baking the crust before adding filling helps maintain a crisp texture and prevents sogginess.
- → Is it necessary to peel the apples?
Peeling is optional; leaving skins on adds color and texture, but peeled slices offer a smoother appearance.